 Enquiry Now

 Contact Us


 Check Out
 +44 20 4571 2395

 PRINCE2® Foundation and Practitioner Training


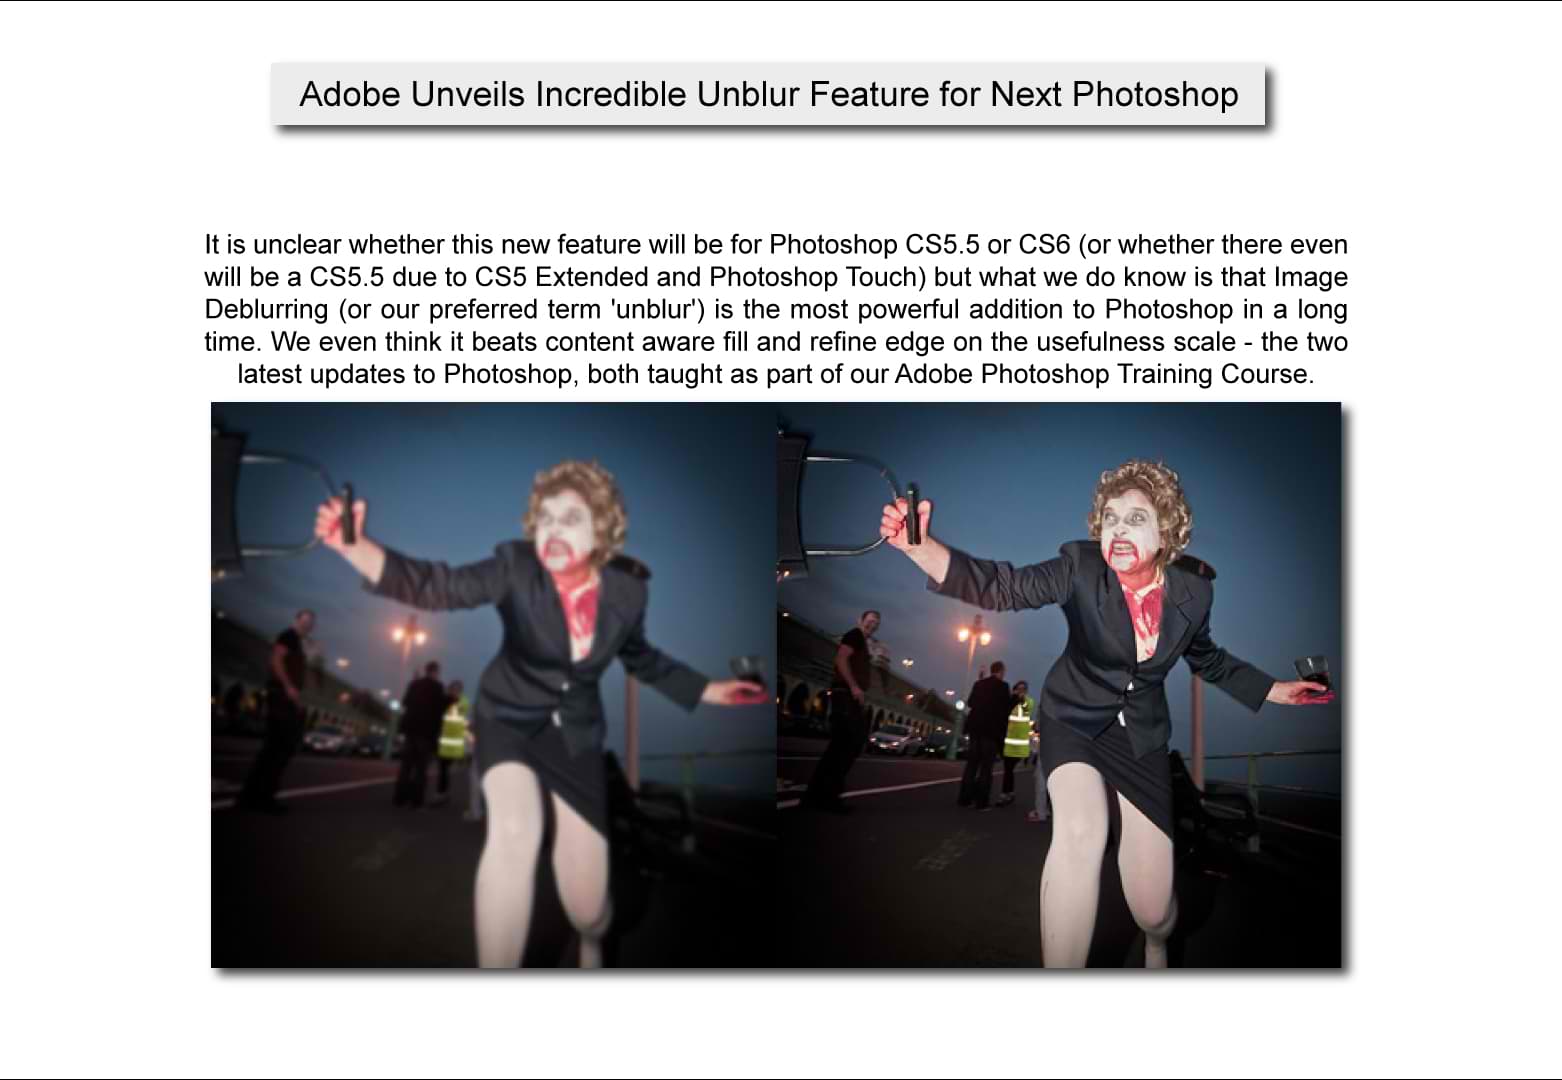
It is unclear whether this new feature will be for Photoshop CS5.5 or CS6 (or whether there even will be a CS5.5 due to CS5 Extended and Photoshop Touch) but what we do know is that Image Deblurring (or our preferred term 'unblur') is the most powerful addition to Photoshop in a long time. We even think it beats content aware fill and refine edge on the usefulness scale - the two latest updates to Photoshop, both taught as part of our Adobe Photoshop Training Course.
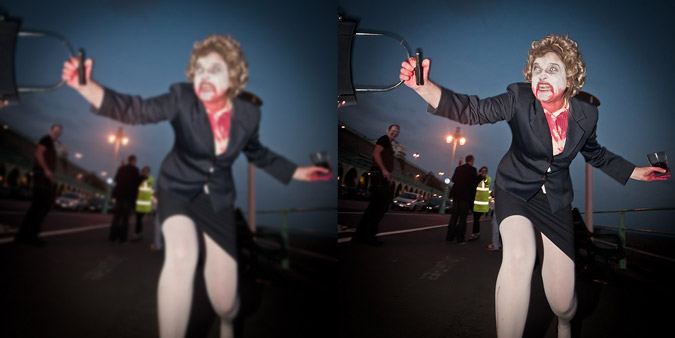
Mocked up results of Photoshop Image Deblurring. Photo by Heather Buckley.
Image Deblurring was revealed by Adobe during this month's keynote conference - Adobe Max. They also revealed Photoshop Touch, an imminent release for tablets - follow the link for our write up on that tool. Here is the full video of the announcement at Adobe Max, look out for the audience reaction at 2.33, 4.50 and 6.06. You may also notice Rainn Wilson, famous for playing Dwight in the American Office.
 Aaron Charlie
 25 Oct 2011
It is unclear whether this new feature will be for Photoshop CS5.5 or CS6 (or whether there even will be a CS5.5 due to CS5 Extended and Photoshop Touch) but what we do know is that Image Deblurring (or our preferred term 'unblur') is the most powerful addition to Photoshop in a long time. We even think it beats content aware fill and refine edge on the usefulness scale - the two latest updates to Photoshop, both taught as part of our Adobe Photoshop Training Course.
Mocked up results of Photoshop Image Deblurring. Photo by Heather Buckley.
Image Deblurring was revealed by Adobe during this month's keynote conference - Adobe Max. They also revealed Photoshop Touch, an imminent release for tablets - follow the link for our write up on that tool. Here is the full video of the announcement at Adobe Max, look out for the audience reaction at 2.33, 4.50 and 6.06. You may also notice Rainn Wilson, famous for playing Dwight in the American Office.
Aaron Charlie
25 Oct 2011

The Street Photography Competition is now closed!

Tate Modern by Heather Buckley
Our new Street Photography Competition gives you a chance of winning onOne Software's superb Perfect Photo Suite - more details on this great prize can be found below.
The 'Street' theme is open to your own interpretation, just get your feet on the street and start snapping!
If you are after some inspiration have a look at Eric Kim's work, Eric is a well known and respected Street Photographer from LA.
The successful winner will also gain lots of exposure through our Twitter and Facebook accounts. Follow us on Twitter to see if you're mentioned as our own weekly favourite entry! It's worth following Heather on Google+ too (the photographer of the image above).
Note - our Twitter mentions don't necessarily mean you've been shortlisted - our Judge Eric Kim will be choosing the winner, more info on him below...
Aaron Charlie
3 Oct 2011
The Street Photography Competition is now closed!
Tate Modern by Heather Buckley
Our new Street Photography Competition gives you a chance of winning onOne Software's superb Perfect Photo Suite - more details on this great prize can be found below.
The 'Street' theme is open to your own interpretation, just get your feet on the street and start snapping!
If you are after some inspiration have a look at Eric Kim's work, Eric is a well known and respected Street Photographer from LA.
The successful winner will also gain lots of exposure through our Twitter and Facebook accounts. Follow us on Twitter to see if you're mentioned as our own weekly favourite entry! It's worth following Heather on Google+ too (the photographer of the image above).
Note - our Twitter mentions don't necessarily mean you've been shortlisted - our Judge Eric Kim will be choosing the winner, more info on him below...
Aaron Charlie
3 Oct 2011
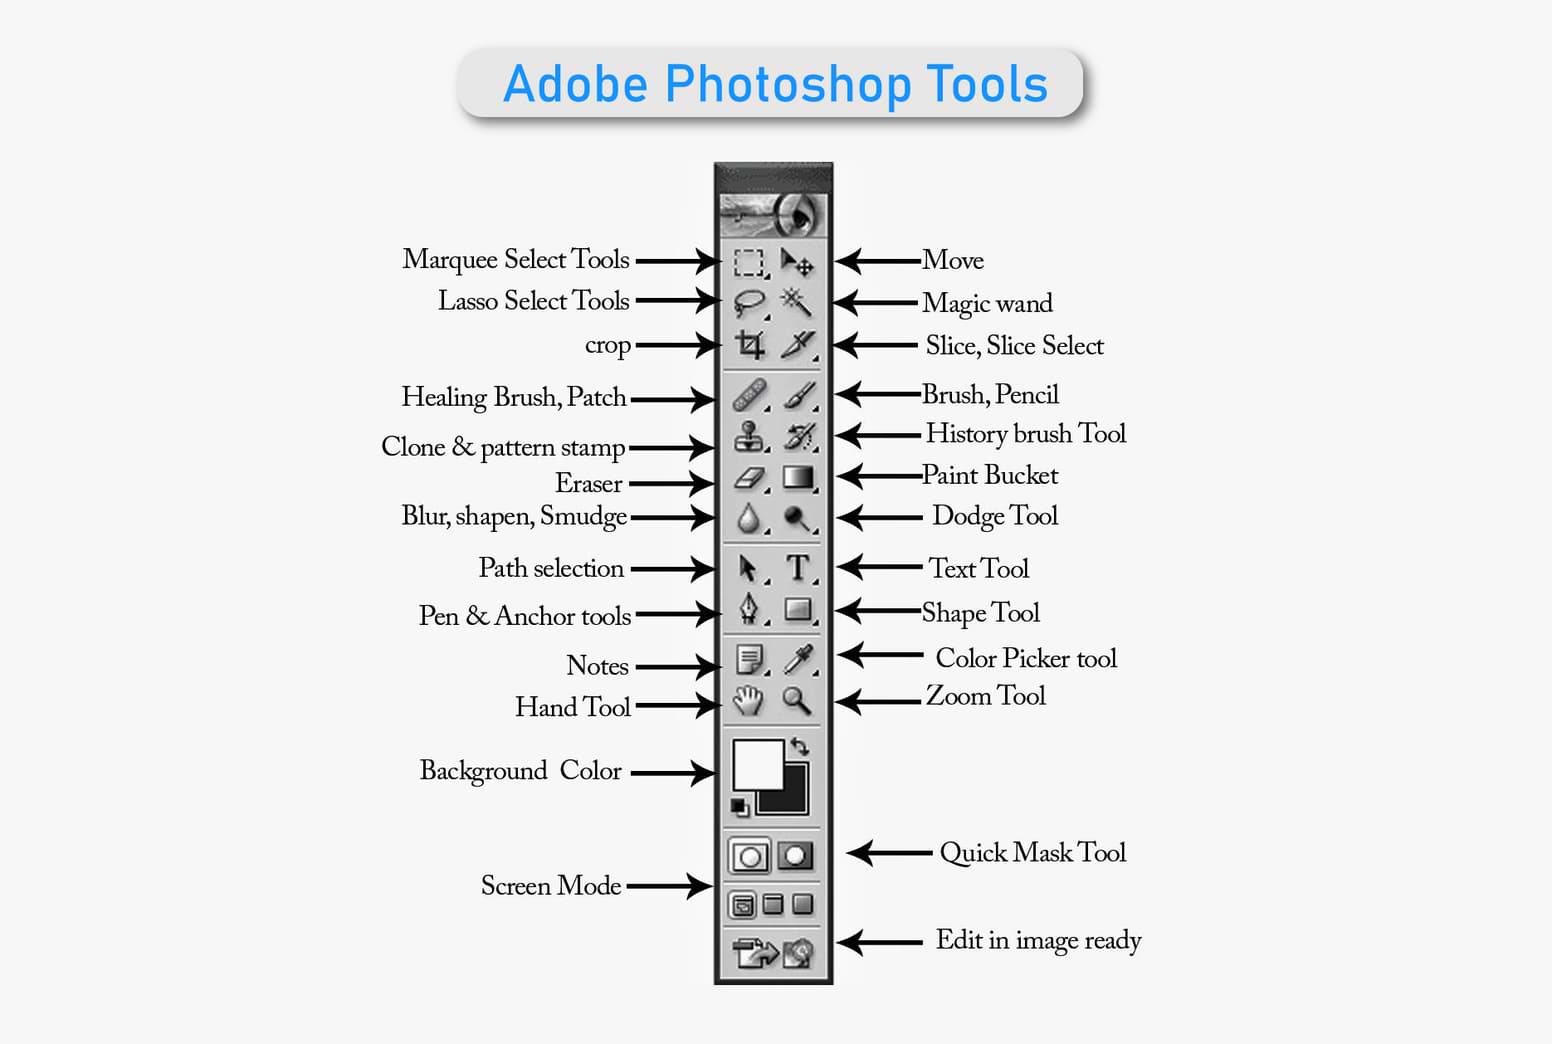
Photoshop tools are found in the Toolbox, which appears on the left side of the screen when you first start Photoshop. When you see a little arrow in the bottom corner it means that you can reveal other tools by clicking on the arrow. You can learn more about all the Photoshop tools and how they are used on our Photoshop courses, including Lightroom training.
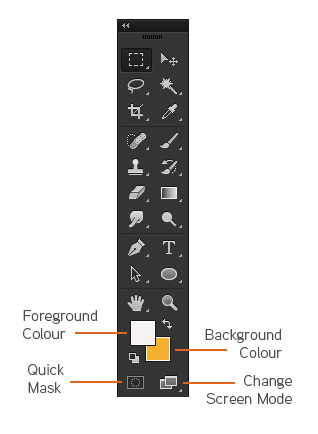
Apart from the Photoshop tools listed below you can select your foreground and background colours here. Double clicking on foreground or background squares will bring up the colour picker.
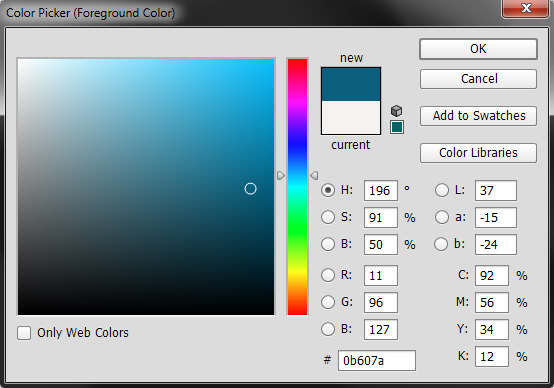
Clicking on the small black and white squares will bring the colour well back to black and white. Some useful keyboard shortcuts to remember and get used to are the X key to swap the foreground and background colours, and D to set the colours to their default settings.
You can also create masks (though it can be easier through the layers palette), change workspace view or go to image ready.
| Button | Tool Name | Action |
|---|---|---|
| Rectangular Marquee | Rectangular Marquee - Makes a rectangular selection and provides access to the Elliptical, Single Row, and Single Column Marquee Tools | |
| Move | Move - Moves selections, layers, and guides (rulers) | |
| Lasso | Lasso - Draws free-hand segments of a selection's border and provides access to the Polygonal Lasso Tool and Magnetic Lasso Tool | |
| Magic Wand | Magic Wand - Selects consistently coloured areas without requiring you to trace the outline | |
| Crop | Crop - Removes unwanted portions from an image. | |
| Eyedropper | Eyedropper - Allows you to get colors from an image to designate as a new background or foreground color. It also provides access to the Color Sampler and Measure Tools | |
| Spot Healing Brush | Spot Healing Brush - Corrects imperfections in an image by making them disappear into the surrounding image. It also provides access to the Healing Brush Tool, Patch Tool, and the Red Eye Tool | |
| Brush | Brush - Paints brush strokes onto an image and provides access to the Pencil Tool and Color Replacement Tool | |
| Clone Stamp | Clone Stamp - Paints a clone of an image or area of an image you have already selected. It also provides access to the Pattern Stamp Tool | |
| History Brush | History Brush - Paints a copy of one image state or snapshot of an image into your current image's window. It also provides access to the Art History Brush Tool | |
| Eraser | Eraser - Erases pixels wherever the mouse is clicked. It also provides access to the Background Eraser and Magic Eraser Tools | |
| Gradient | Gradient - Creates a gradual blend fill between colors and also provides access to the Paint Bucket Tool. For more information, see Working with the Gradient Tool | |
| Blur | Blur - Softens the edges of an image. It also provides access to the Sharpen and Smudge Tools | |
| Dodge | Dodge - Allows you to darken or lighten areas of an image. It also provides access to the Burn and Sponge Tools | |
| Path Selection | Path Selection - Makes shape or segment selections that show anchor points, direction lines, and direction points. It also provides access to the Direct Selection Tool | |
| Horizontal Type | Horizontal Type - Allows you to insert text onto an image. It also provides access to the Vertical Type, Horizontal Type Mask, and Vertical Type Mask Tools | |
| Pen | Pen - Allows you to create, edit, or smooth lines and shapes. It also provides access to the Freeform Pen, Add Anchor Point, Delete Anchor Point, and Convert Point Tools | |
| Draw Rectangle | Rectangle - Allows you to draw different shapes. It also provides access to the Rounded Rectangle, Ellipse, Polygon, Line, and Custom Shape Tools. | |
| 3D Rotate Tool | 3D Rotate Tool - Allows you to rotate the document canvas. It also provides access to the 3d Roll View, Pan View, Walk View and Zoom Tools. | |
| 3D Orbit Tool | 3D Rotate Tool - Allows you to change the position or scale of a 3D model.. It also provides access to the 3d Rotate, 3D Roll, 3D Pan, 3D Slide and 3D Scale Tools. | |
| Hand | Hand - Moves an image within its window | |
| Zoom | Zoom - Magnifies or reduces the view size of an image |
Heather Buckley
21 Feb 2007
Photoshop tools are found in the Toolbox, which appears on the left side of the screen when you first start Photoshop. When you see a little arrow in the bottom corner it means that you can reveal other tools by clicking on the arrow. You can learn more about all the Photoshop tools and how they are used on our Photoshop courses, including Lightroom training.
Apart from the Photoshop tools listed below you can select your foreground and background colours here. Double clicking on foreground or background squares will bring up the colour picker.
Clicking on the small black and white squares will bring the colour well back to black and white. Some useful keyboard shortcuts to remember and get used to are the X key to swap the foreground and background colours, and D to set the colours to their default settings.
You can also create masks (though it can be easier through the layers palette), change workspace view or go to image ready.
| Button | Tool Name | Action |
|---|---|---|
| Rectangular Marquee | Rectangular Marquee - Makes a rectangular selection and provides access to the Elliptical, Single Row, and Single Column Marquee Tools | |
| Move | Move - Moves selections, layers, and guides (rulers) | |
| Lasso | Lasso - Draws free-hand segments of a selection's border and provides access to the Polygonal Lasso Tool and Magnetic Lasso Tool | |
| Magic Wand | Magic Wand - Selects consistently coloured areas without requiring you to trace the outline | |
| Crop | Crop - Removes unwanted portions from an image. | |
| Eyedropper | Eyedropper - Allows you to get colors from an image to designate as a new background or foreground color. It also provides access to the Color Sampler and Measure Tools | |
| Spot Healing Brush | Spot Healing Brush - Corrects imperfections in an image by making them disappear into the surrounding image. It also provides access to the Healing Brush Tool, Patch Tool, and the Red Eye Tool | |
| Brush | Brush - Paints brush strokes onto an image and provides access to the Pencil Tool and Color Replacement Tool | |
| Clone Stamp | Clone Stamp - Paints a clone of an image or area of an image you have already selected. It also provides access to the Pattern Stamp Tool | |
| History Brush | History Brush - Paints a copy of one image state or snapshot of an image into your current image's window. It also provides access to the Art History Brush Tool | |
| Eraser | Eraser - Erases pixels wherever the mouse is clicked. It also provides access to the Background Eraser and Magic Eraser Tools | |
| Gradient | Gradient - Creates a gradual blend fill between colors and also provides access to the Paint Bucket Tool. For more information, see Working with the Gradient Tool | |
| Blur | Blur - Softens the edges of an image. It also provides access to the Sharpen and Smudge Tools | |
| Dodge | Dodge - Allows you to darken or lighten areas of an image. It also provides access to the Burn and Sponge Tools | |
| Path Selection | Path Selection - Makes shape or segment selections that show anchor points, direction lines, and direction points. It also provides access to the Direct Selection Tool | |
| Horizontal Type | Horizontal Type - Allows you to insert text onto an image. It also provides access to the Vertical Type, Horizontal Type Mask, and Vertical Type Mask Tools | |
| Pen | Pen - Allows you to create, edit, or smooth lines and shapes. It also provides access to the Freeform Pen, Add Anchor Point, Delete Anchor Point, and Convert Point Tools | |
| Draw Rectangle | Rectangle - Allows you to draw different shapes. It also provides access to the Rounded Rectangle, Ellipse, Polygon, Line, and Custom Shape Tools. | |
| 3D Rotate Tool | 3D Rotate Tool - Allows you to rotate the document canvas. It also provides access to the 3d Roll View, Pan View, Walk View and Zoom Tools. | |
| 3D Orbit Tool | 3D Rotate Tool - Allows you to change the position or scale of a 3D model.. It also provides access to the 3d Rotate, 3D Roll, 3D Pan, 3D Slide and 3D Scale Tools. | |
| Hand | Hand - Moves an image within its window | |
| Zoom | Zoom - Magnifies or reduces the view size of an image |
Heather Buckley
21 Feb 2007
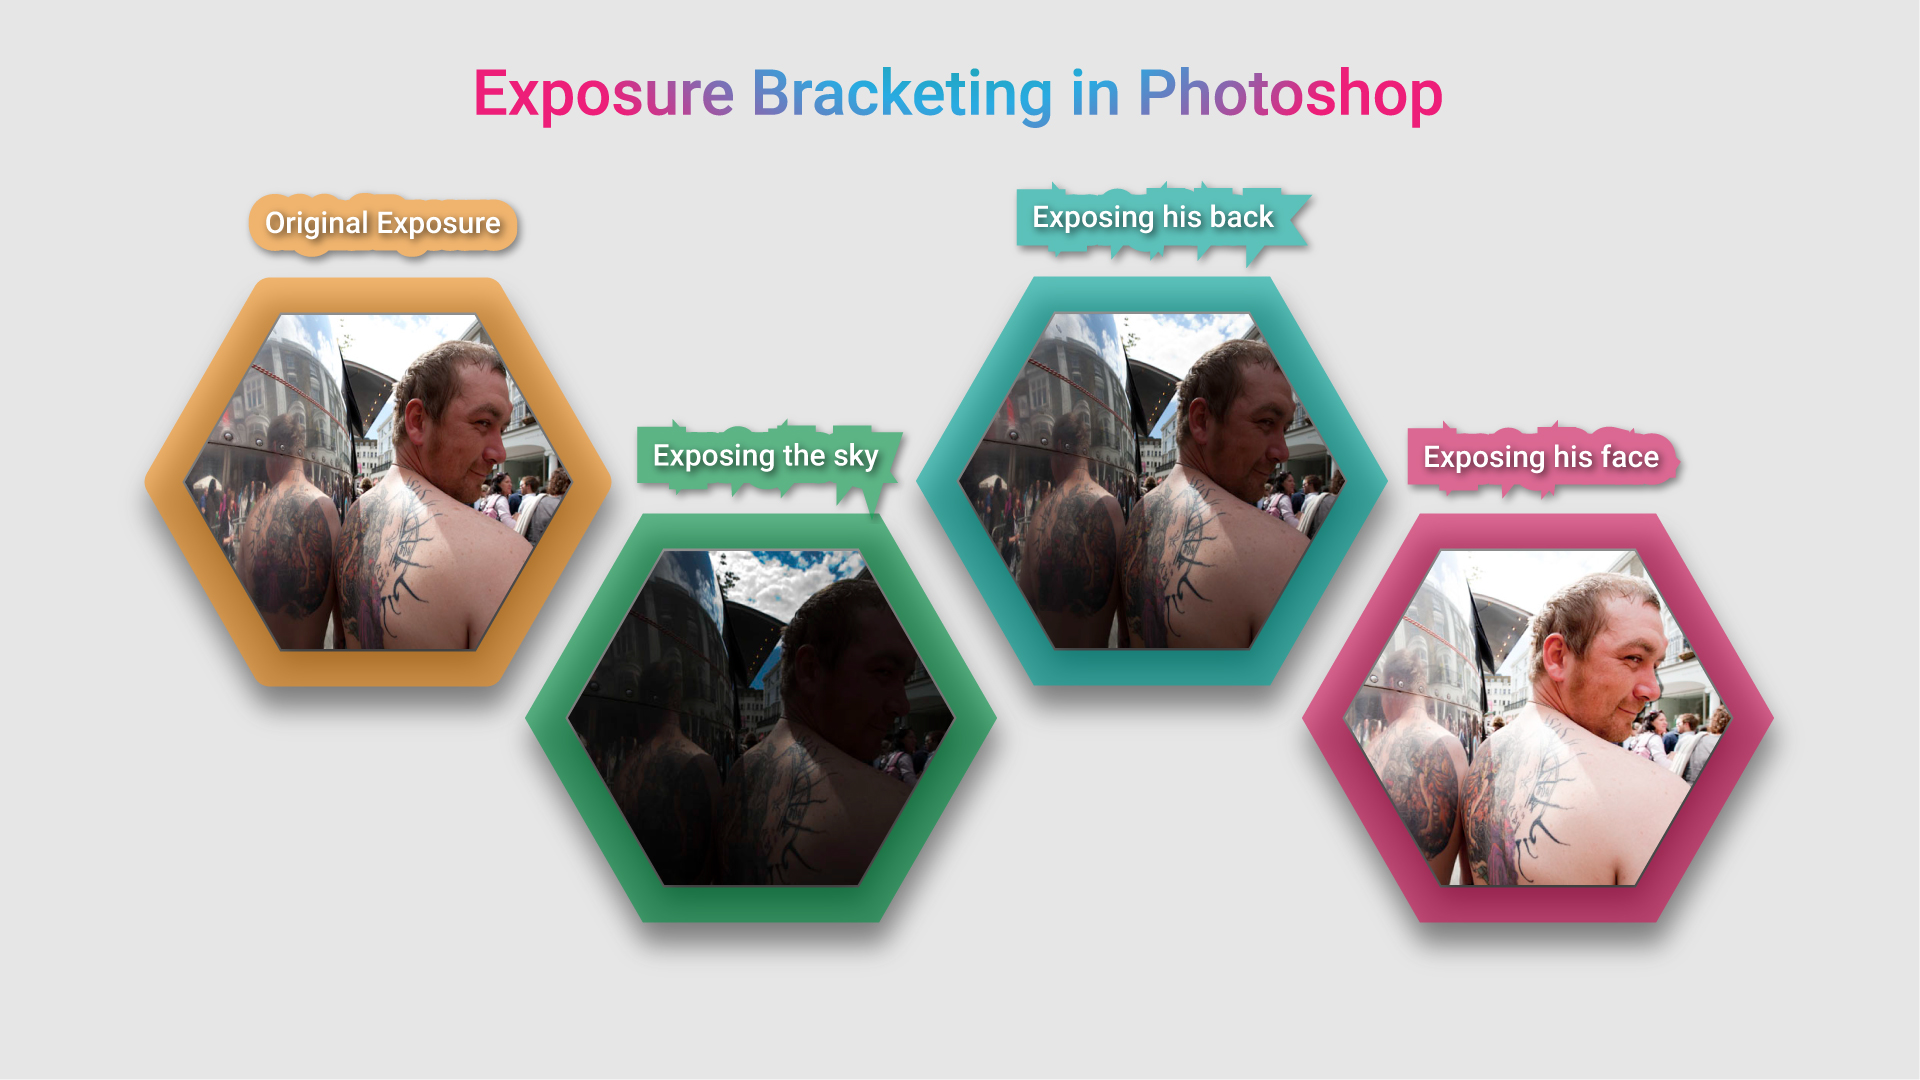
HDR (High Dynamic Rage) Images have become rather popular of late, with the latest iPhones using the feature in their camera technology. I've found that not everything looks great with the exposure spread throughout and it can make the image look weird and unnatural. Trouble with exposure bracketing is you need to take at least three pictures at different exposures, and it's best done with a tripod. Not that useful for street photography so here's a little cheat that gets great results.

In this tutorial I am going to show you how to get more drama from an image by using bracketed exposures. This technique is very useful when you are in difficult light/ exposure conditions, it allows you to be in control of how much detail you want, or don’t want, in your image.
What is Exposure Bracketing?
Exposure Bracketing is when you take a normal photo and then take two more, but under-expose one (normally -1 or -2 stops) and over-expose the other (usually +1 or +2 stops). You can take more and you can change the amount of stops depending on how much detail you want, but 3 images is normally sufficient.
How to cheat at Exposure Bracketing in Photoshop
There are two ways of putting an HDR image together, you can import your chosen images into Photoshop and use the ‘Merge to HDR’ tool (I admit I have used it before, but I don’t really like it) or you can use masks to retrieve the details from the highlights and lowlights.
Heather Buckley
12 Aug 2011
HDR (High Dynamic Rage) Images have become rather popular of late, with the latest iPhones using the feature in their camera technology. I've found that not everything looks great with the exposure spread throughout and it can make the image look weird and unnatural. Trouble with exposure bracketing is you need to take at least three pictures at different exposures, and it's best done with a tripod. Not that useful for street photography so here's a little cheat that gets great results.
In this tutorial I am going to show you how to get more drama from an image by using bracketed exposures. This technique is very useful when you are in difficult light/ exposure conditions, it allows you to be in control of how much detail you want, or don’t want, in your image.
What is Exposure Bracketing?
Exposure Bracketing is when you take a normal photo and then take two more, but under-expose one (normally -1 or -2 stops) and over-expose the other (usually +1 or +2 stops). You can take more and you can change the amount of stops depending on how much detail you want, but 3 images is normally sufficient.
How to cheat at Exposure Bracketing in Photoshop
There are two ways of putting an HDR image together, you can import your chosen images into Photoshop and use the ‘Merge to HDR’ tool (I admit I have used it before, but I don’t really like it) or you can use masks to retrieve the details from the highlights and lowlights.
Heather Buckley
12 Aug 2011
 Need Any Help?
Recent Blogs

 Enquire Now


