Enquiry Now

 Contact Us


 Check Out
 +44 20 4571 2395

 PRINCE2® Foundation and Practitioner Training


 Maggie
 29 Dec 2012

Working with Large Files in Excel
In this post, our Excel trainer Maggie runs through using large files in Excel.
Split Screen and Freezing Panes
In many cases, you might find it helpful to work with different sections of your worksheet at the same time.
For example, you might want to keep the data in row 4 visible while you scroll down to look at information located in row 35. You do this by applying split bars.
If you already know how to use split bars but are struggling with other aspects of Excel, why not try our Advanced Excel Training.
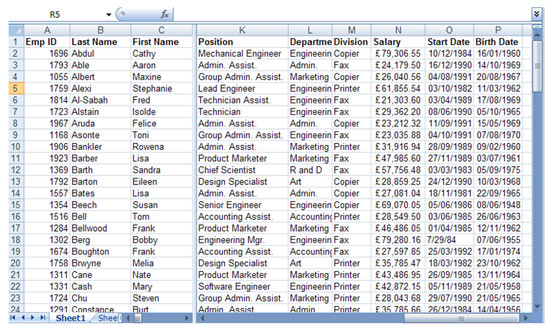
Applying Split Bars
When you apply split bars to a worksheet, Excel creates identical copies of the worksheet side by side. If you apply either a horizontal or vertical split bar, you can scroll within one pane while the other pane remains stationary.
Although the Split command can be accessed from the View Menu, you can also manipulate split bars with the mouse using thesplit boxes. You can move between the different panes by simply clicking the pane in which you want to work. Because each pane is a view of the same worksheet, a change in one pane means a change to the worksheet.
The VIEW tab contains the option to SPLIT.However, if you do choose to split using this option, Excel will split the Window at the current location, i.e. the cell you are currently in. You will probably end up with a horizontal and vertical split.
To Split a Window horizontally, place the mouse over the Split Symbol and drag it half way down the vertical scroll bar. To Split a Window vertically, place the mouse over the Split Symbol and drag half way across the horizontal scroll bar.
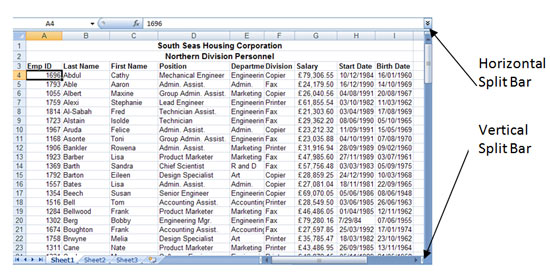
Examples of Split Windows
Notice two horizontal scroll bars are available. In the example above, columns A, B, C can be seen at the same time as columns K-P.
Notice two vertical scroll bars are available. In the example above, rows 1, 2, 3 can be seen at the same time as rows 9-28.
For other beginner's Excel tips and tricks, try our post on 3 Hidden Gems in Excel.
Freezing & Unfreezing Panes
Another way to divide your worksheet into panes is by freezing sections of the worksheet. Freezing panes is useful when you are working with large tables because you can hold horizontal and vertical labels static while you move through the data.
Freezing the Top Row or Left Column
- Select the VIEW tab
- Choose FREEZE
- Select whether to choose TOP ROW or FIRST COLUMN
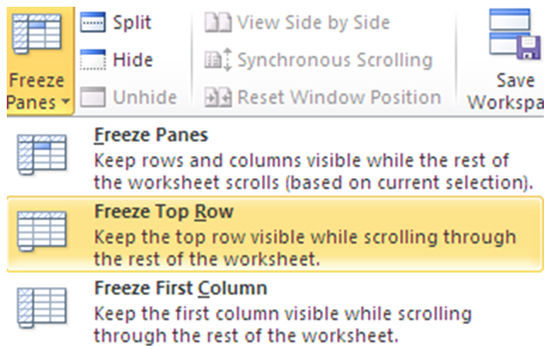
Note that Excel will freeze the Row or Column that is currently visible in the screen. Therefore, if you need to freeze Row 1 or Column A you should move to this area of the Workbook before choosing either of these options.
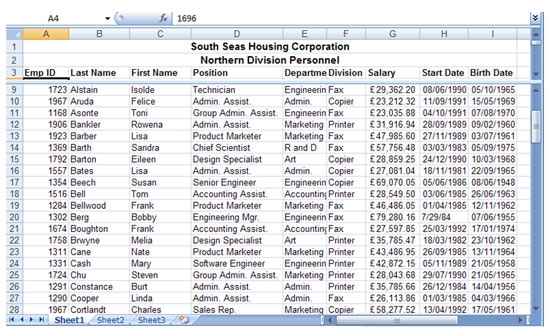
Freezing Columns and Rows
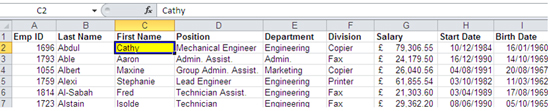
The most important thing when freezing rows and columns is the current location in the document. In the example below, the first row and first two columns will be frozen. This is based on the current location, highlighted in yellow.
- Select the location in the Worksheet (See paragraph above)
- Select the VIEW tab, choose FREEZE PANES
Unfreezing Panes
- From the VIEW tab, choose UNFREEZE PANES
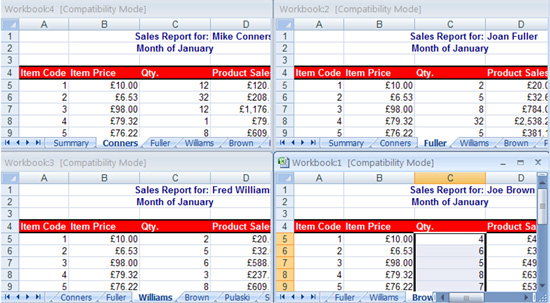
Viewing and Arranging Multiple Worksheet Windows
Often, it is useful to view more than one worksheet at a time. You can arrange worksheets on your screen so that you can view them simultaneously. Once you have more than one copy of your worksheet window open, you can select different worksheets to view from each worksheet window, and then arrange the windows to best suit your needs.
All this would be very different on an iPhone or iPad. Take a look at our post on the recent announcement of Excel for iOS.
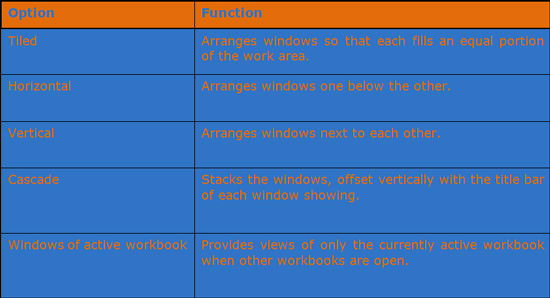
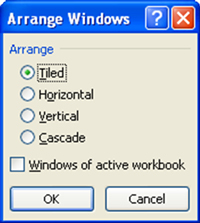
The Arrange Windows dialog box provides options to let you set up your data on the screen. Here these options are summarized:
To view and arrange multiple worksheet windows:
- Open your Workbook
- Select the VIEW tab and select NEW WINDOW
- Repeat this process as many times as necessary, i.e. if you wish to view four sheets at the same time you will need three new windows
- Select the WINDOWS Menu, then ARRANGE ALL
- Choose the appropriate look, i.e.TILED
- Select Windows of Active Workbook to ensure that only the windows of the current file are tiled
- Select OK
To go back to one Window:
- Close down all but one window
- Maximize the remaining window
If you're new to Excel and would like to learn more, try our Beginner's Excel Course.
Posted under:
 Need Any Help?
Recent Blogs