Enquiry Now

 Contact Us


 Check Out
 +44 20 4571 2395

 PRINCE2® Foundation and Practitioner Training


 Andy Trainer
 10 Dec 2010
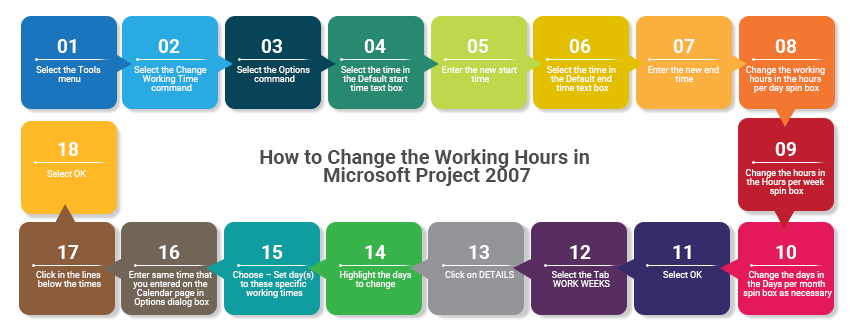
How to Change the Working Hours in Microsoft Project 2007
Microsoft Project allows you to plan, monitor and schedule your resources to manage your projects effectively. This tutorial shows you how to change the standard working hours in Microsoft Project 2007.
If you want to learn more about Microsoft Project, check out our 2 day Microsoft Project Training in for a comprehensive introduction. We also provide Project Management Training and PRINCE2 Training to provide you with excellent project management skills.

Changing the Working Hours
In Microsoft Project, the default project calendar, called the Standard calendar, defines the standard working hours for all projects. The default working hours are 8:00 AM to 5:00 PM, with an hour starting at noon for lunch.
You can modify the working hours to reflect the actual working hours for an entire project. You can also specify the length of the workday. For example, if the standard working hours at your company are 9:00 AM to 5:30 PM with an hour for lunch, you would need to adjust the project calendar.
If the work day is longer or shorter than eight hours and/or starts before 8:00 AM, you need to make these adjustments before entering any tasks or the durations for your project will be incorrect. By default, all tasks are scheduled to start at 8:00 AM. Therefore, if you have entered tasks and altered the working hours so that the work day starts at 7:00 AM, Microsoft Project will not recognize any work completed before 8:00 AM. Microsoft Project will then schedule the extra hour into the next working day and extend the duration of the project.
When you change the default working hours, you make the changes in the Options dialog box and in the Change Working Time dialog box for the Standard (default)calendar. The Options dialog box allows you to change the working hours and the duration of the work day. You can also indicate the number of working days in the month, with 20 days being the default. The changes you make in the Change Working Time dialog box must match the changes made in the Options dialog box. For example, you change the working hours in the Options dialog box to 7:30 AM to 4:30 PM, with eight hours in the work day. You then need to change the working time in the Change Working Time dialog box for the Standard calendar to 7:30 AM to 4:30 PM with an hour break, equalling an eight hour work day.
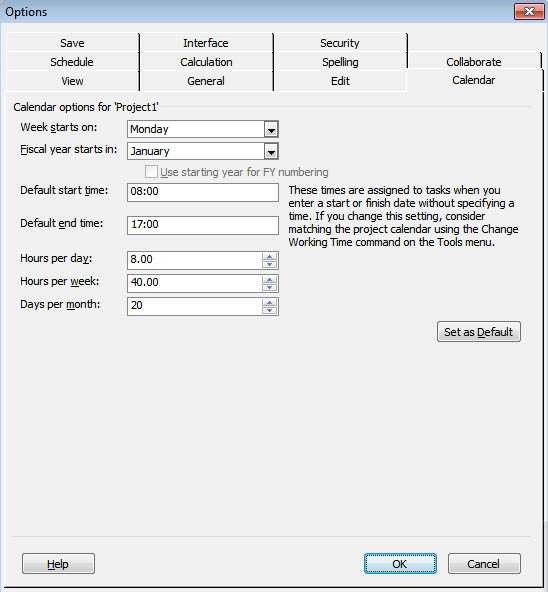
The Calendar page in the Options dialog box
If you change the settings on the Calendar page in the Options dialog box and then select the Set as Default option, each new project will be scheduled according to these settings. For this reason, you should not select this option unless all of your projects will be scheduled according to these settings. For example, if you set a project to have a seven hour work day, each new project will default to a seven hour day.
- Select the Tools menu.
- Select the Change Working Time command.
- Select the Options command.
- Select the time in the Default start time text box.
- Enter the new start time.
- Select the time in the Default end time text box.
- Enter the new end time.
- Change the working hours in the Hours per day spin box to correspond with the new working time.
- Change the hours in the Hours per week spin box to correspond with the new working hours.
- Change the days in the Days per month spin box as necessary.
- Select OK.
- Select the Tab WORK WEEKS
13. Click on DETAILS
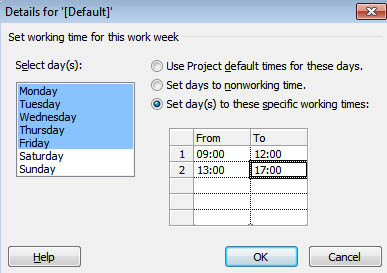
14. Highlight the days to change, i.e. Monday - Friday
15. Choose – Set day(s) to these specific working times
16. Enter the same time that you entered on the Calendar page in the Options dialog box. (Allowing the time for lunch)
17. Click in the lines below the times
18. Select OK.
Adding a Non-Working Day
By default, the project calendar defines the standard working days (Monday through Friday) and nonworking days (Saturday and Sunday) for a project. The default calendar has no holidays, so you must mark the appropriate holidays as nonworking days. It is very important to mark all applicable nonworking days as durations are calculated according to this calendar. In any view, nonworking days are identified with gray shading.
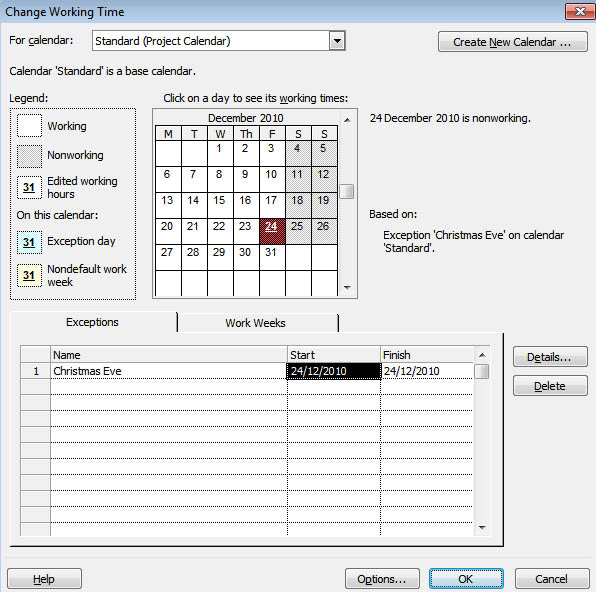
The Change Working Time dialog box
- Select the Tools menu.
- Select the Change Working Time command.
- Display the month in the calendar in which you want to add the nonworking day.
- Select the day(s) on the calendar you want to add as nonworking.
- Select the Exceptions Tab
- Enter a Name for the holiday, i.e. Christmas Eve.
- Click on the Start Date and the dates you selected should appear in the Start and Finish Date boxes
Posted under:
 Need Any Help?
Recent Blogs