Enquiry Now

 Contact Us


 Check Out
 +44 20 4571 2395

 PRINCE2® Foundation and Practitioner Training


 Aaron Charlie
 3 Feb 2012

The Complete Facebook Timeline Guide
|
Timeline was originally for developers only, then became public but only through opt in. Now, they're forcing it on everyone. As of this week you don't have a choice - make the change or get off Facebook (find out how to do that at the end of the post!) Now that Facebook are thrusting their new Timeline profile structure on to all who haven’t already upgraded to it we thought it would be a good time to give a full rundown of what you can do with it, so you can have full control over your virtual story of your life. |
 |
We have covered how to customise your profile, how to manage your privacy settings, any new features that have been rolled out since our last post and how to delete your account. Because there's so much info we've provided a helpful contents list to help you navigate to the right section!
If you're looking to use Facebook as a marketing tool then you should come on our Social Media course. This 2-day workshop is perfect for learning how to use social media for marketing and can be booked as a package with a title="SEO Training" href="/seo/seo-training">SEO Trainingand Content Marketing Training. Call us on 01273 622272 to hear more about the course or to discuss your training requirements.
Update: This post has been updated to include some even newer updates recently made by Facebook.
Contents
- Layout
- Privacy
- New Features
- Maps
- Backing Up Data
- Actions
- The Ticker(new!)
- Image Viewer(new!)
- Apps
- Deleting Your Account
New Facebook Design
The most obvious change to Facebook is the appearance. As well as the Timeline itself, Facebook have added in a cover photo. In this section we take a look at some examples of eye-catching cover photos and show you how to create your own.
Facebook Timeline Cover Photo
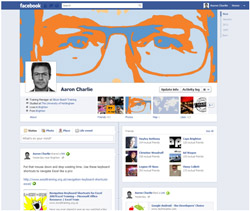
Facebook have often been criticised for the lack of customisable options on profile pages. People want their personal profiles to stand out with custom designs but the old Facebook layout didn’t allow this. You had to express yourself in the confines of a small profile photo. All that has now changed with the new Facebook Timeline!
You can now add a cover photo to your profile – an 850px by 315px space that you can fill however you like. You can get really creative with your cover photo as shown in the examples below:
Here are six of our favourites:
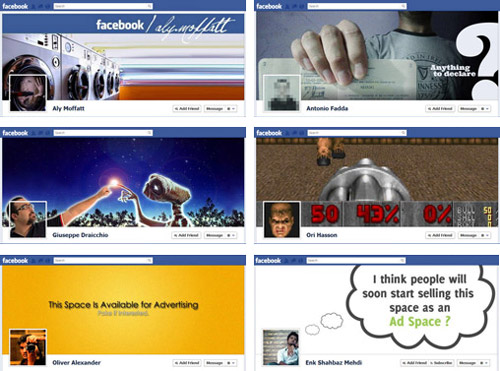
Those last two aren't far off the mark. A number of companies including Mountain Dew have started offering free Timeline photos for people stuck for inspiration. This is a rather clever advertising trick that should some businesses and bands a huge amount of free publicity.
Youcouldedit an image to fit the given proportions or upload any image and resize within Facebook. However, if you want to be able to see how your photo will appear then you should use our Facebook Cover Photo Photoshop Template. This will allow you to get really creative as you can see how your photo will look once uploaded and be able to make any necessary changes as you go.
Creating a custom Facebook Timeline Cover Photo
Because our Google+ profile template has proved so popular we have done the same for Facebook!
Step 1
Download and unzip our Facebook Timeline Cover Photo Photoshop Template
Step 2
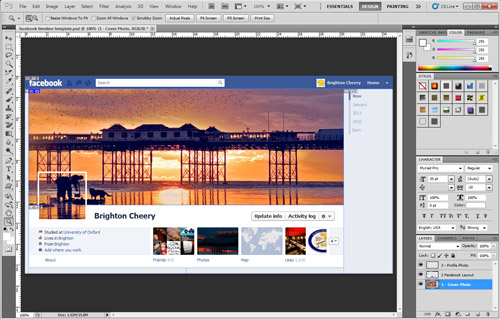
Load the template into Photoshop. We have left a background image in as an example so you can see how the template works. This is named ‘Layer 1 – Cover image’. Replace this layer with your chosen image, making sure it is underneath layers 2 and 3.
To do this, first click on layer 1 and then select File > Place and chose your file. It should appear as a layer in between layers 1 and 2.
Step 3
Move your image around to get it in the right place. If you want to be creative like us then you can choose an image that can be split into a cover image and profile photo. Use Edit > Free Transform to move and resize your image so that it is in the right place and you’re ready for the next step. Step 4 Now it is time to save your cover photo! You must hide layer 3
form to move and resize your image so that it is in the right place and you’re ready for the next step.
Step 4
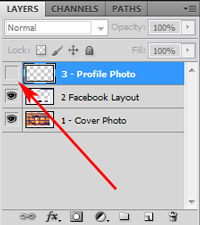
Now it is time to save your cover photo! You must hide layer 3
at this point otherwise your image will have an unwelcome square on it. To do this click the eye symbol:
Now you’ve done that, selectFile gt; Save for Web & Devices. We recommend you save as a JPEG and reduce the quality to 80 to minimise file size.
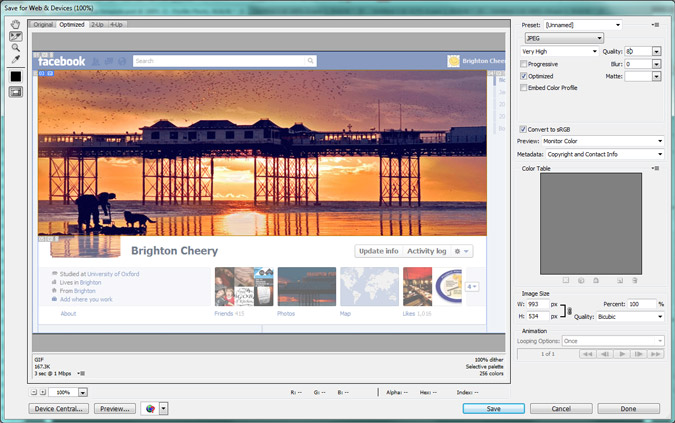
The window shows you which part of the file will save. Because we have sliced the dimensions of the cover photo already this is the only part of the template that will be saved.
When you click save a pop up appear. Chose the location for your image and then make sure you select ‘All User Slices’ from the ‘Slices’ drop down menu. Otherwise you will end up will a load of unwanted files!
p style="text-align: center;"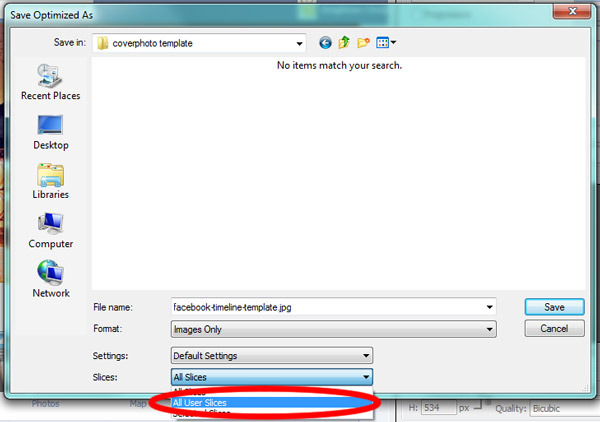
Step 5
You’re now ready to upload your cover image!
Open up Facebook and go to your profile page. Firstly, hover your existing cover image and click ‘Change Cover’ and then ‘Upload Photo’.
p style="text-align: center;"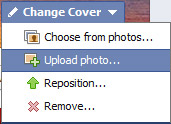
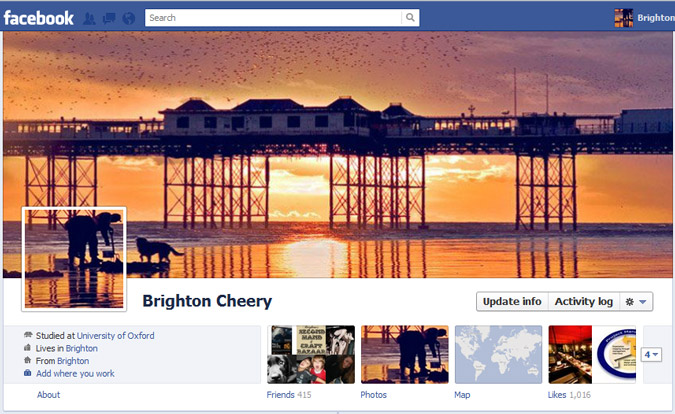
Facebook will prompt you to reposition your cover but if you’ve followed our guide properly you won’t have to so just click ‘Save Changes’. Et voila, your cover image has appeared.
If you want to show off you can cut out the corresponding part of your image to use as your profile photo. This can look great as you can see below:
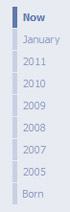
PrivacyThe main difference to the old profile set up, aside from the layout itself, is the ease by which you can look back through your posts over the years you have been active on Facebook. Before, to find older posts that are over several years old, the friend, foe or stranger trying to look for them would be faced with a battle of patience, having to continually scroll down and click the “Older Posts” link to gradually go further back in time. However, now with the Timeline you can roll back the years with a simple click, all thanks to the date bar on the right side of the profile. This is why you need to be more vigilant about what information you post or have already posted and who you allow to see it. |
 |
Locking Down Your Timeline – The Past
Over the years you can easily rack up hundreds if not thousands of updates, whether they are uploaded or tagged photos, status updates or friend requests. All of these updates are now all organised in chronological order for you or your stalker's pleasure, so it may be best to limit what can be seen by all.
|
|
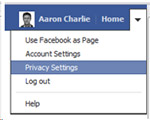
First of all, go to your Privacy Settings found in the drop down menu at the top right of the screen (as shown in screenshot). From here you want to go to Limit the Audience for Past Posts to control who can see your previous posts, so there’s no need to permanently delete those drunken University pictures you desperately want to keep away from your employers' (or parents!) eyes. |
If you feel that limiting access to everything is a bit overkill then you can set the privacy settings for each individual post on your Timeline. Yes it is a bit of a pain but you do get complete control of your content this way.
|
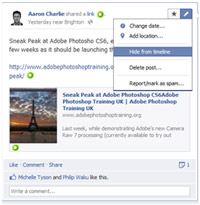
You can do this on your own Timeline by hovering your cursor over the post you want to modify. Once hovering you should see two buttons in the top right corner of the post; one will allow you to resize it, putting extra emphasis on it on your Timeline, while the other gives you options to Edit or Remove the post. Clicking on this will reveal more options, where one of which is Hide from Timeline, which does exactly what it says. You can also use the other options to add extra information to the post which will be applied to the Timeline or even delete the post forever. |
 |
Now you have to work down through your Timeline deliberating what you would like to keep, hide or delete. There are some items on your Timeline that get grouped together, such as new friend acceptances, making it easier to hide or delete as you work through your listings
Locking Down Your Timeline – The Future
The first thing that anyone who is concerned about revealing too much information about themselves needs to do is to make their Timeline private.
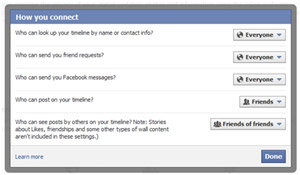
To do this you need to go back to the trusty Privacy Settings and then How You Connect. From this screen you will be faced with a pop up (as seen below), where you can customise your viewing settings for others so you can save your Timeline for your friends, friends of friends, everyone or save everything for yourself by selecting Only Me
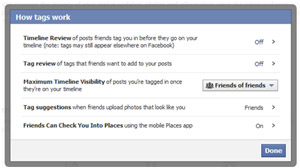
While you are on the How You Connect screen it would be a good time to take a look at the How Tags Work section, where you will be greeted by another pop up (again, shown below). By changing the Maximum Timeline Visibility you can control who sees post you are tagged in. If none of the default options meet your requirements then select Custom to specify specific people or lists you don’t want seeing the posts, or alternatively select Only Me to completely lockdown who can post on your Timeline.
Cleaning Up Other People’s Timelines
Odds are you have posted something on someone else’s wall at some point or another: this will now be placed on their Timeline in chronological order also making it easier to find. So if you have all of a sudden been hit with feeling of regret for a series of mockingly abusive posts to a friend some years before, you might want to hide the evidence on your friend’s Timeline on their behalf.
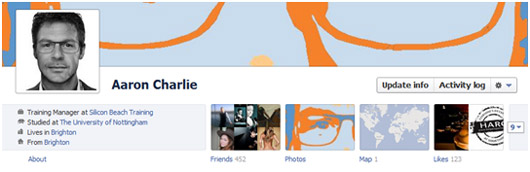
You can do this through the Activity Log found on your own Timeline. In the Activity Log you can view all of your interactions and movements on Facebook, including pages you have liked, apps you have used and posts to peoples walls you have made, scarily displayed with when, and for the smartphone addicted social networkers, where you made the post. Luckily, like posts on your own Timeline, you can decide what can be seen and what style it is displayed in, if at all! Make sure you use the filter feature at the top right of the screen to speed up the process.
Safeguarding
So once you have your Timeline set up as you want how are you going to monitor and manage it in the future? After all that work the last thing you want is for one of your mates to post some potential argument fuel on your nice squeaky clean Timeline. So if this concerns you there is a new feature to prevent unsavoury content contaminating your Timeline in the guise of Timeline Review.
This feature allows you to moderate posts before they are published live to everyone. So by going through your pending posts you can approve or reject all posts and content as they come in.
New Features
Facebook are always coming up with and implementing new ideas that there are some major additions to the site since our last update post. Here are some of the most important new features...
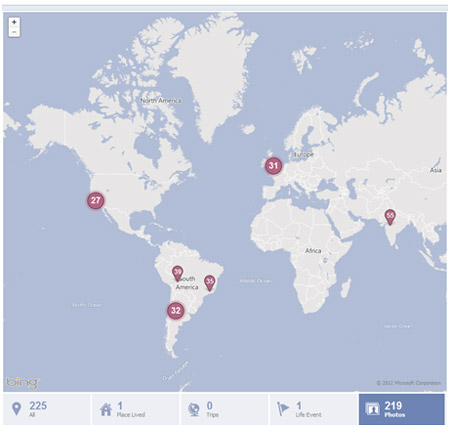
Mapped
Have you wondered why Facebook has been so keen to ask for your location as of late? Why on earth would they want to know where all your photos were taken, status updates were made or even where you are at the moment? Well now they have taken this information and mapped it out for you, so you can see where all of your key moments, and the occasionally mundane ones if you’re one of those people who like to check into Starbucks that is, occurred.
You can access the map from the top of your own Timeline, in-between your photos and your Likes. From here you will be presented with a Bing generated world map marked with all of the places you have been geo-tagged, as seen below.
If you are not keen of people being able to view your very existence as a series of dots on a map then luckily you can hide it from your Timeline. Also, images you have been tagged in fall under the Maximum Timeline Visibility area of the Privacy Settings which we covered earlier.
If you have been tagged or checked into somewhere on the map you really don’t want to be associated with, you can get rid of it on your map by clicking on it to display more details, then clicking on the date stamp where you will be taken to the original post or update. Once there you get the option; Remove from Profile so you can dissociate yourself from it.
Back up, Back up
You’ll see from organising your new Timeline that your Facebook account has accumulated a lot of data, including your photos and videos. If you want to back all of these up to your own computer it is possible and would be recommended if you were thinking of deleting your account at some stage.
![]()
To do this, you need to go to Account Settings in the top right corner of the page (part of the drop down arrow menu).At the bottom of your general account settings you will see a small link saying “Download a copy of your Facebook Data”. This will take you to the Archive; page. Now you need to click on the Start My Archive button where you will be faced with another pop up confirming you choice. It will then take a while for Facebook to collect all of your info together, but they will email you when it’s ready so you can download it directly to your computer.
Action!
No longer can you only ‘Like’ something on Facebook, not with Facebook Actions. A wealth of new verbs and nouns have been added so you can more accurately express your actions. So now you can ‘watch’, ‘read’, ‘own’, 'want' and ‘listen’ amongst many other things, but alas no ‘dislike’.
These actions will be triggered by the new Facebook Timeline apps (read below), so you can share more accurately with your friends what is going on in your life, and head.
Ticked Off!You may have noticed that in the autumn of last year Facebook launched a Facebook within your Facebook…sidebar that is. This Inception-esc widget was called the Ticker and kept you up to date with all of your friends’ actions as they happen, in a very Final Score Vidiprinter style. While some said that it was a bit of an unnecessary update we were stuck with it, that is until now. Now Facebook have made it possible to hide the Ticker so you can cut down the clutter on your sidebar. |
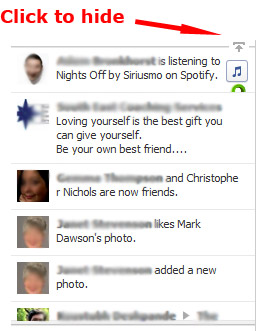 |
A New View
Another recent change has been made to Facebook’s photo viewer, now appearing as a dark pop-up lightbox. This lightbox is accompanied by a white image information, comments and options area to the right of the image, so you can now view more without having to scroll down the page.
You also my notice the gear button in the top right hand corner of the viewer. When you click on this you are given additional image options so you can easily add extra information to the photo.
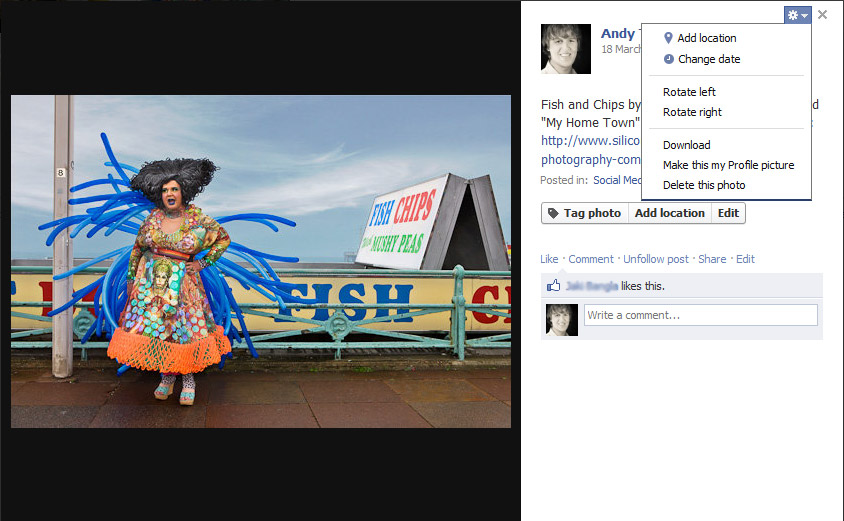
Another use for this white bar on the right is to introduce adverts into your Facebook image viewing experience. While not all images will have ads attached to them expect to see them appearing around a photo near, or even of, you soon!
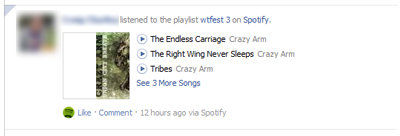
Facebook Apps
Apps have been around for a while, but rather than being housed in the APPS section of your left hand sidebar these new apps interact with your Timeline in a new way. For example, if you are using Spotify to listen to music and connect with Facebook, what you are listening to is sent and published on your Facebook Timeline. Friends can actually listen along in time to your music! If you see a friend listening to a song just click the little 'Play' arrow and you will join in.
Other similar Apps have appeared since. The Guardian app publishes what articles you have read on their Facebook app, while the Trip Advisor app will publish where you are travelling to. Overall, this makes social sharing of information easier than it has ever been before, essentially doing it for you! However, will notifying all of your friends as to what you are listening to, reading or where you’re going change your user habits? All of a sudden those guilty pleasures become potential triggers for social suicide, so do you cut them out or display them with pride?
Time to Move On
If you find that the amount of data Facebook has on you is becoming a bit scary or that these changes are a bit much for you there is always the option to delete your account. Not deactivation, but full on deletion.
Antisocial Network
If you do decide to go through with it you’ll find that Facebook doesn’t give up without a fight, keeping your account on life support for two weeks after you press delete. If you decide to try logging back in to your account or try to interact with any Facebook apps embedded in other websites your account will do a Lazarus and make a full recovery from the jaws of death. However, if you can go the full two weeks cold turkey then say goodbye to your Facebook self: you have been freed! Life after Facebook may seem like a fantasy, but it really can be achieved, and to prove it to you we show you how. Just bare in mind that once your account is deleted everything on it so gone for good, so you might want to back everything up before hand (skip to the backing up section).
Deletion
So you’re going ahead with it. You brave soul, let us hold your hand through the ordeal.
- Go to this link to delete your account
- You should see a box like the one below. When you feel composed enough click the “Delete my account” button
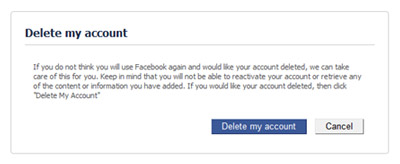
- A wild pop up will appear; feed it your password and completed captcha code
Now the important bit. Whatever you do, over the next two weeks don’t try to log into your Facebook account. It may feel tempting, but think of it as drunk dialling an ex, no good can come of it so DON’T DO IT!
There doesn’t seem like any way round this two week cooling off period, but you can always try to contact Facebook directly to request it. Try contacting them at privacy@facebook.com first of all. If you don’t hear anything back from them after a few days then you can always try support@facebook.com; or info@facebook.com.
Posted under:
 Need Any Help?
Recent Blogs